| |
|
We think the following is the most important
part of the relaxing and setting process. Moving the wings, head and
antennae, to make sure that they are nice and supple and easy to move, is VERY
IMPORTANT. If you get these steps right it will make the final setting of
the specimen on the board really easy. If you get disturbed at any time, just remember to place your specimen
back in the relaxer, so that it doesn't start to dry out while you are
away. |
|
|
 |
|
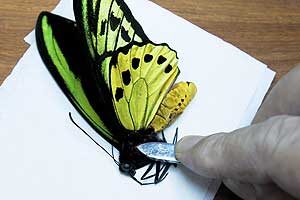
Lay your specimen on several layers of tissue. This will
soak up any excess moisture as you squeeze the thorax of your specimen. Use the handle
of your tweezers, and press down firmly on the thorax, just below where
the wings join. You will feel the inside of the specimen start
to give as
you exert pressure. Move up and down the thorax (not the abdomen),
pressing firmly. Turn the specimen over and do the same on the other side.
|
 |
|
Now pick your specimen up by the thorax at the base of the wings, and
squeeze. You will notice that as you squeeze the wings will open. If you
see any excess water anywhere, especially at the base of the wings inside,
just dab it up with a small piece of
tissue. You don't want it soaking on to the wings at any time and staining
them.
|
 |
|
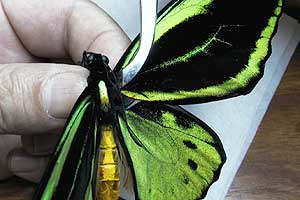
Hold your specimen between thumb and forefinger, and grab
the very base of the hind wing with your strong pair of tweezers. Do not
be afraid to hold on tightly with the tweezers as you do not want them to
slip for the next step. Now move the hind wing up and down, as though the
butterfly was flying. Then move the hind wing back and forth. CAREFUL, you
will feel the muscles start to give as you do this and you don't want to
pull the wing off, now do you.
Repeat the process for both hind wings.
|
 |
|
Now for the fore wings. Squeeze the thorax
with your fingers, so that the wings open up, dab up any water
droplets you might see. Now grab the very base
of the fore wing with your tweezers, right where it joins the thorax. Now
move it up and down as though the butterfly was flying and back and forth.
just like you did with the hind wing. Again you will feel the muscles
giving as you do this.
|
 |
|
Make sure you move the fore wing as far
forward as it will go, even a little further than is shown here in the photograph.
But be careful again not to pull it off. Now do the same for the other fore wing.
When you have finished you should be able to move all the wings very
freely.
|
 |
|
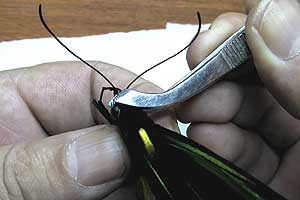
Many people make the mistake of not doing
anything with the head or antennae at this stage (or at all). It is far easier to get these supple now, rather than trying to move them
when the specimen is spread on the setting board. Again grab the head with the tweezers, laying the antennae down as you do
this. Now twist the head from side to side, through 180 degrees if necessary.
It's alright, you won't twist it off if you are careful. You will now find that the head can also be moved around quite easily.
|
 |
|
Lastly, all you have to do is move the antennae
around a bit so that they also move easily. Grab the base of the antennae
carefully and move them up and down and back and forth. Your specimen is
now ready for the final setting. Place it back in the
relaxer, while you go and make yourself another cup of coffee.
By the way, If you get disturbed by the phone or anything while you are
doing all this, don't forget to place the specimen back in the relaxer, so that it will
not dry out while you are way. |
|
PREVIOUS PAGE
NEXT - Inserting Pin |
|
|